First off, I’d like to say a very special thank you to every single one of you Soccermanagerites for reading Part one’s blog and allowing our announcement of it to hit over 1k likes on Facebook within the first week of publishing! 👏 👊 It shows me that these tactical insights are very much in demand and brings me even more excitement knowing that I’ve gotta keep my quality high!
For those of you who haven’t checked out the first installment yet, I’ll leave a link to it as well as a link to my Facebook account where we explain everything Soccer in an attempt to completely change the way you view Soccermanager at the end of this blog post.
Now then, unto today’s main event! 🌟
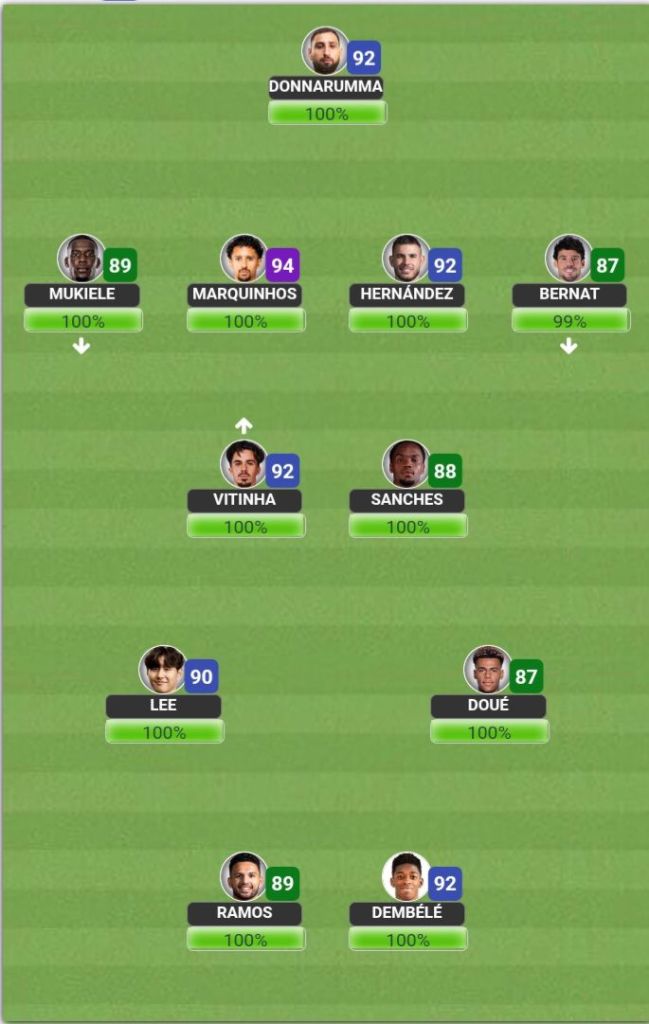
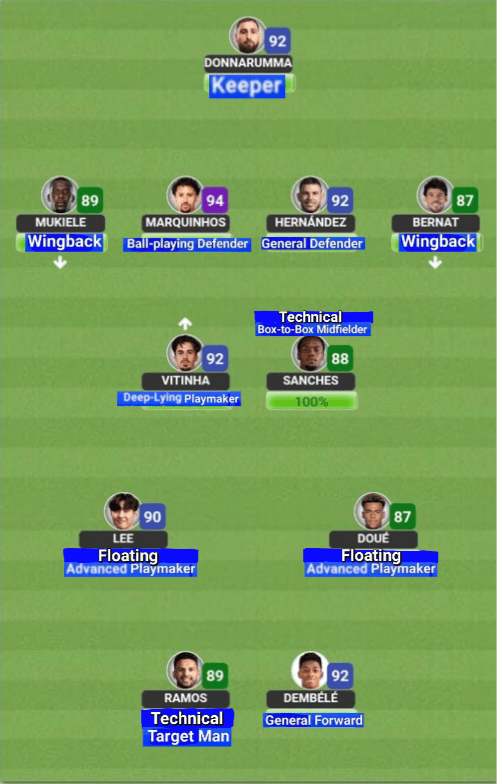
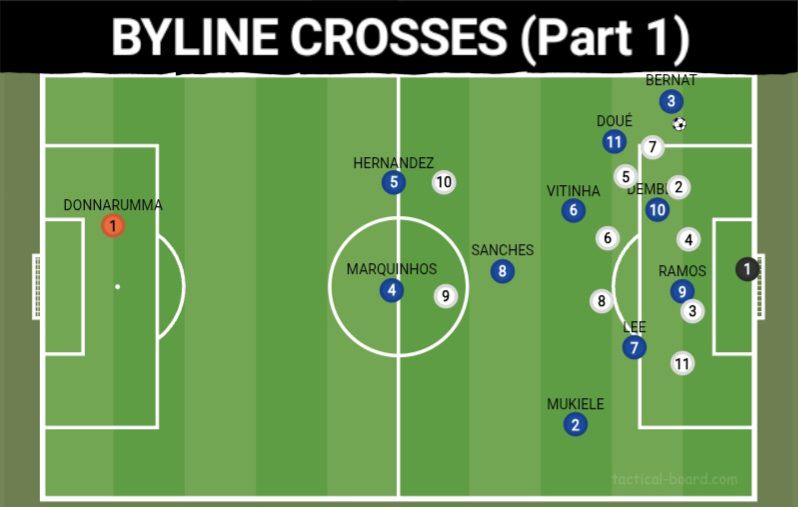
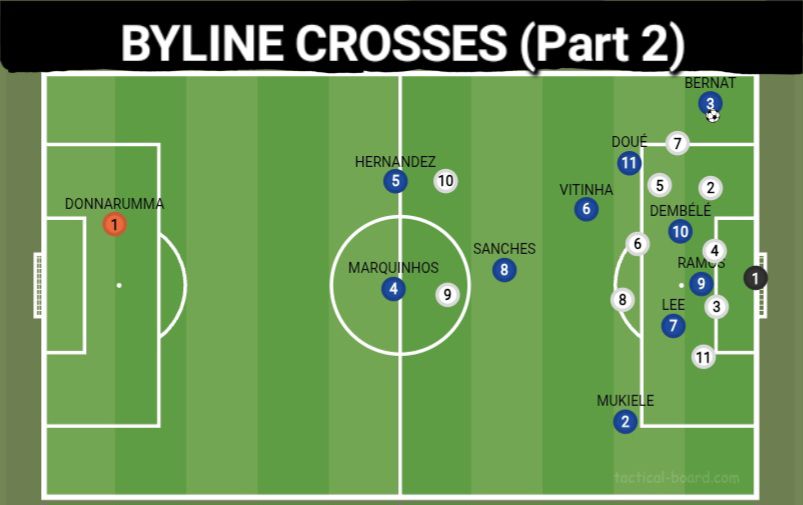
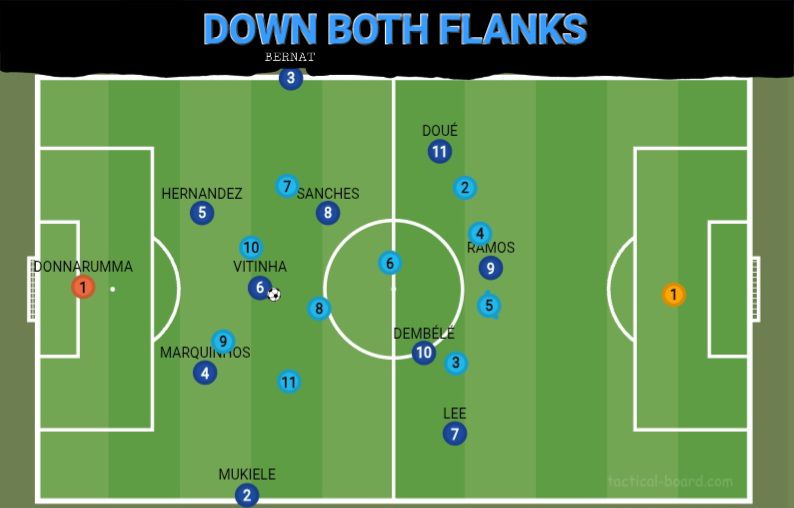
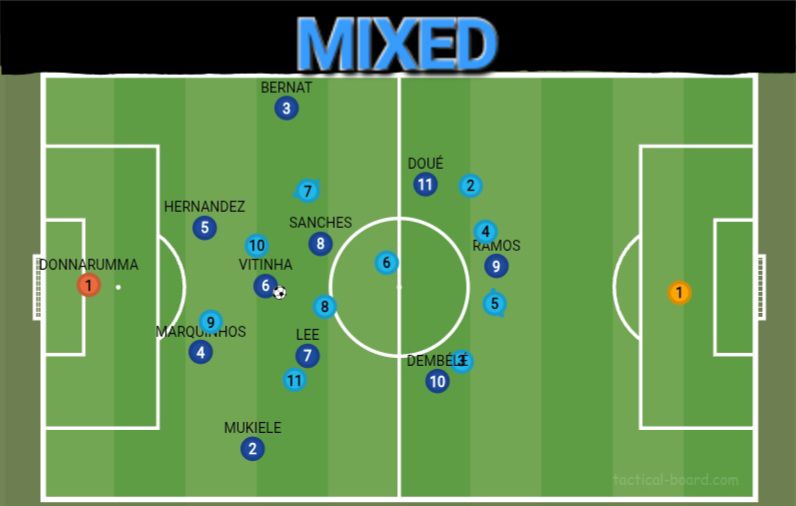
A reminder of the starting XI that we will be using to represent the varying tactical explanations we’ll be going through. Was planning on switching to a different team but that may have caused a bit of confusion, and this way you get to see the entire tactical breakdown of one starting XI and one formationHere are the respective player roles for each player. Remember that it will have an impact on the overall capability of this P.S.G XI to perform at their best since not every tactical option will resonate with the chosen players and formation (you really gotta check out Part 1 after this if you haven’t already…)Here’s the section we’ll be going over today 🙌
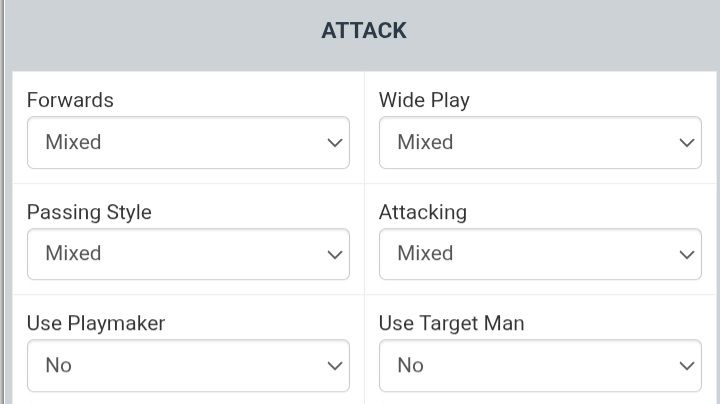
ATTACK: Forwards
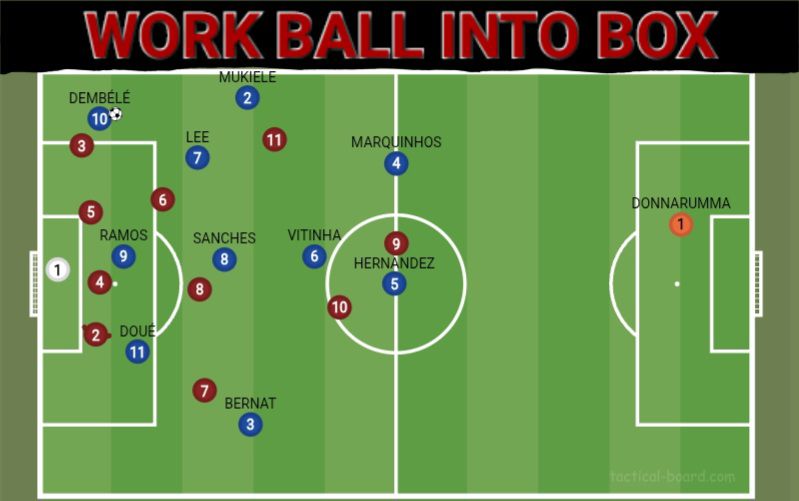
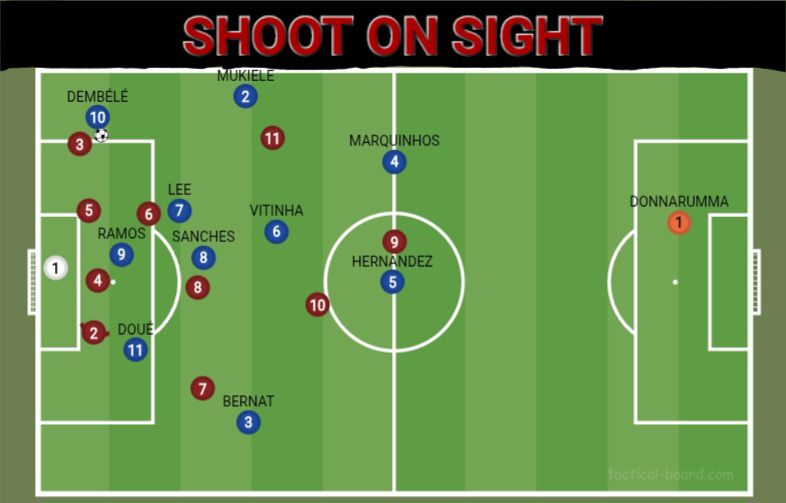
This option is for the Managers among us who simply love to see the recycling of a football between players on end. For these illustrations, remember it’s all about the attention to detail, and we will be focusing on the location of the ball the most.
Ousmane Dembélé (who’s having a PHENOMENAL season in real life) has drifted outwide and seeks to keep the ball recycling. Rather than aiming to take on his man, he’s already looking to play a more simple pass to his nearby teammates Nordi Mukiele or Kang-in LeeHere comes that attention to detail!
This is an option for teams who have a lot of goal scorers who’d prefer to have 5 shots at goal rather than 5 chances created. We see the French Baller look to now take on his defender in an attempt to get the ball into the box. What this does is to expound to your players that it’s more about getting shots on goal rather than “tippy tappy” football (as Sam Allardyce once infamously stated), so the likes of Lee and Renato Sanches are seeking to get into the box for a potential cross rather than being a simple passing optionThe best of both Worlds!
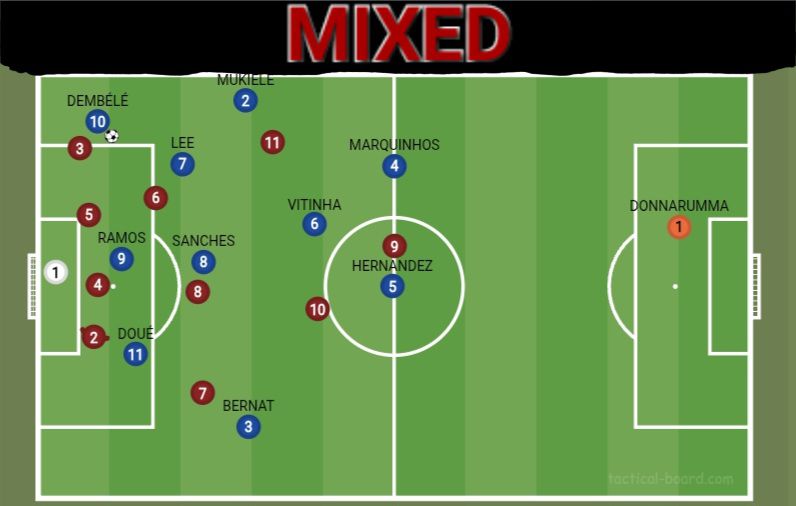
Not because it seems plain, we shouldn’t be sleeping on mixing things up! It allows for a bit more unpredictably which makes it slightly more challenging for the opposition to know what your players will do next.
In this scenario, Dembélé has the options of a short pass to Lee, Sanches making a risky run into the box for the cross, or laying it back to Mukiele who’s seeking to get into the action
ATTACK: Wideplay
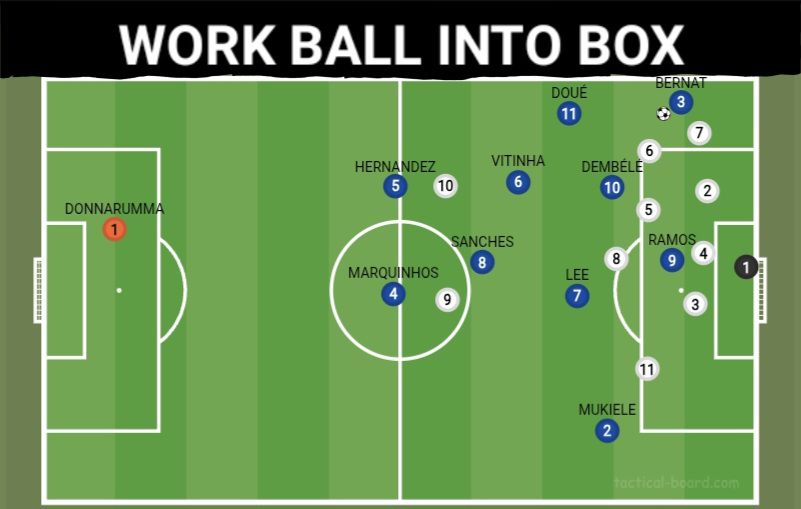
It’s quite a similar phenomenon to the W.B.I.B option for the Forwards section, as the main gist will be to aim for a bit more ball retention when your team has possession in wider areas. And here we have Juan Bernat in possession with a supporting cast of Désiré Doué, Dembélé and Ferreira Vitinha all looking to get into the act.
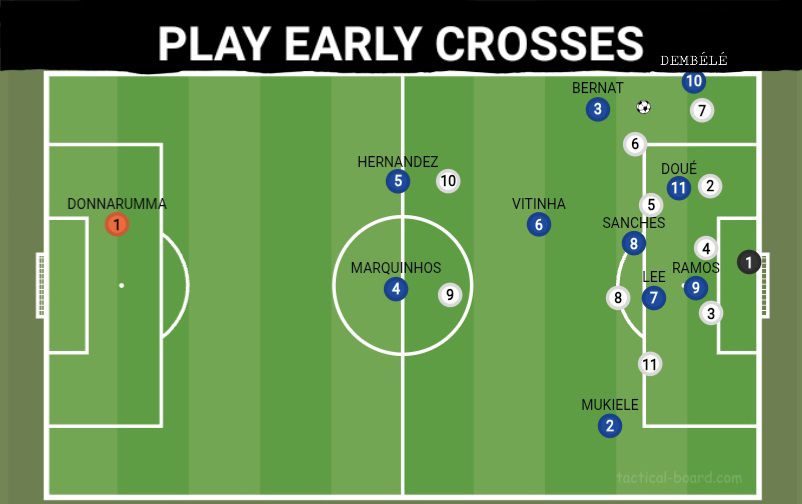
Side note: The defensive team for this illustration is set up within a 3-5-2 formation, with the first one being a 4-4-2AOne’s all about continous passing while the other is about continous crossing… The main aim for this tactical approach is to use early crosses as a manner of getting the ball into the box against a potential unsettled backline. It works great for when utilizing a counter attacking, direct style of play but sometimes oppositions have a good defensive structure which means that the aim will be to use cut backs in order to get whipped balls into the box (as we can see happening within this illustration with Dembélé cutting it back for Bernat to cross it first time. Oh, and just look at the difference it provides to the other attacking teammates compared to the W.B.I.B option #details )Arguably the least used option, this tactic is actually in- tandem with the Work Ball Into Box option as it allows your team to hold unto the ball for a bit longer in order to get an overlap going and dig floated or drilled balls into the box in order to flood the area and overwhelm your opposition with numbers. The only difference is that the Work Ball Into Box does not require an out and out number 9 who can put his head where it hurts while this option always will.
This illustration shows Bernat receiving the ball from Doué after making an overlapping run with the ball in front of him (for more of a better visualization, Vithinha passed to Doué who then held unto the ball Jack Grealish style waiting on Bernat to make the overlapping run)As Bernat receives the ball he is in pole position to cross it with P.S.G having some numbers flocking the box. Also realize that this tactical option doesn’t always necessarily need the ball to be crossed exactly at the byline, so the Spaniard’s position is still ideal
ATTACK: Attacking Area
Rather than going over every option, I’ve chosen just to explain the “big 3” (cause who’s even playing Down The Right Flank in today’s game… 🤷)
Here we have P.S.G up against a team who are playing a high pressing 4-2-3-1A formation. Vitinha has the ball and we can now see the T.T.M style in action with Lee dropping in order to form a make-shift midfield 3, Dembélé and Doué both seeking to play in between the lines, and Mukiele and Bernat providing the necessary widthTalk about a difference! 😯
Here’s what you’ll get from a D.B.F style of play as your players will aim to stretch the opposition out as much as possible (which of course means that there will be a larger gap between Vitinha and his teammates). This is a great example of someone getting their tactics completely wrong since there is a clear lack of cohesion as the 4-2-2-2 is not a formation that should be used for the purpose of widthAny Mixed Attacking Area that you choose to implement will only work based on the players at your disposal and, you guessed it, your formation of choice. It just turns out that this Mixed compliments this XI as it allows for that formational fluidity which is on display predominantly with Dembélé drifting a bit wider, Lee helping out in midfield, and Doué occupying his D(R)
ATTACK: Use Target Man
Throughout today’s blog post we haven’t even mentioned Gonçalo Ramos once, and in the words of the G.O.A.T of Basketball, : “he took that personally”.
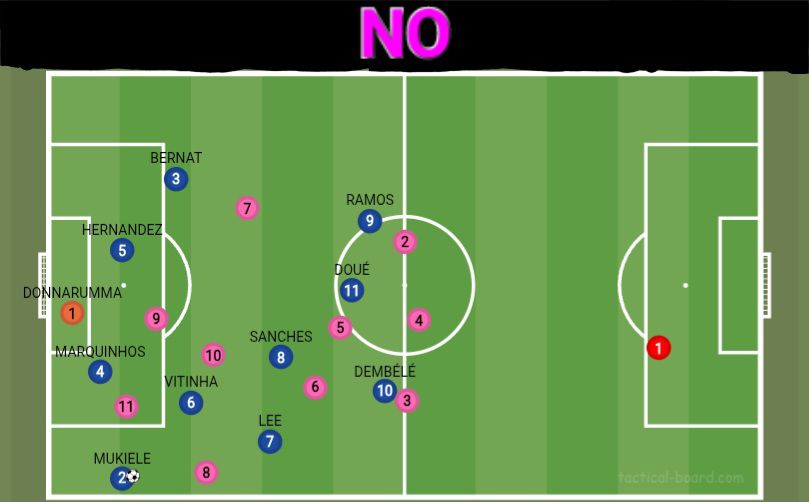
Here’s an interesting way of viewing the use (or lack thereof) of a ‘Target Man’. We’re up against a 3-4-3 team who’s all about that aggressive “gimmie back my 🤬-ing ball” type of chaos. With Mukiele in possession, the option for a pass is tight, but there is always the chance of him simply booting it forward towards Ramos who is occupying two of the back 3’s attention via him leading the line. If you’re playing a more possession based style, the usage of the Portugese as your ‘Target Man’ will at least leave your opposition a man light in their press since good ‘T.M’s’ draw the awareness of 2 or more defenders.Now, it’s not that I condemn going without a ‘Target Man’ (as a matter of fact I use this approach a lot ), but context is important. Whenever we have an actual ‘Target Man’ within our XI (Haaland, Schick, Ramos, Joselu), to choose not to use him will be a disaster since he will feel lost on the pitch beacuse of it. Even though there are some ‘Target Men’ who can operate like a ‘Deep-lying Forward’ (Kane, Zirkzee, Arnautović, and even Ramos), context will be crucial since manuvering this way within this 4-2-2-2 will be a waste due to a lack of space for him to function effectively unless you choose to do some tactical wizardry which might require more mobile No.9’s rather than their static counterpart. So, this leaves the the Portugese in a very odd position where he’s drifted unto the RCB of this 3-4-3 where he poses no real threat in this scenario. And want to know the worst thing about this? Take a look at the position of the backline in this illustration and the one where Ramos was used as a ‘Target Man’… Some of you might balk at the slight adjustment observed, but as John Stones showed Liverpool back in 2019, slight adjustments are what it takes to be crowned champions come the end of the season #details
I’ll catch you in part 3 where we explain our set up when out of possession. See you then, Soccermanagerite! 👊


One thought on “SMW’s New Tactics (Part 2)”