“I am here just to learn, to improve and to help my team improve”- Pep Guardiola
Welcome back soccermanagerites!!!
I’m glad that you’re here yet again and if this is your first exposure to this blogging site then strap in in cause it’s gonna be one hell of a ride! In today’s post we will be beginning a new series looking at the tactical aspects of soccermanager. This is without question the most important component of this game. Your tactics are what you’ll be visualizing about often and it determines the type of players you should be looking to purchase as well as improving your knowledge of how teams in real life set up to play. I could be wrong, but I’m sure that whenever there’s a new player who signs up for this game and he/she sees this page they immediately become hooked (well that’s how it was for me at least). This is gonna be an indepth apporach as there’s lots to look into and we’re not leaving any stone unturned. So, let’s get things started folks!
TACTICS PAGE
Now that you’ve logged in and are ready to go, we head to the club page, going straight to the ‘tactics’ option. It’ll put us on the tactics page. The first thing that that you’ll see on this page is your team’s current starting X1:
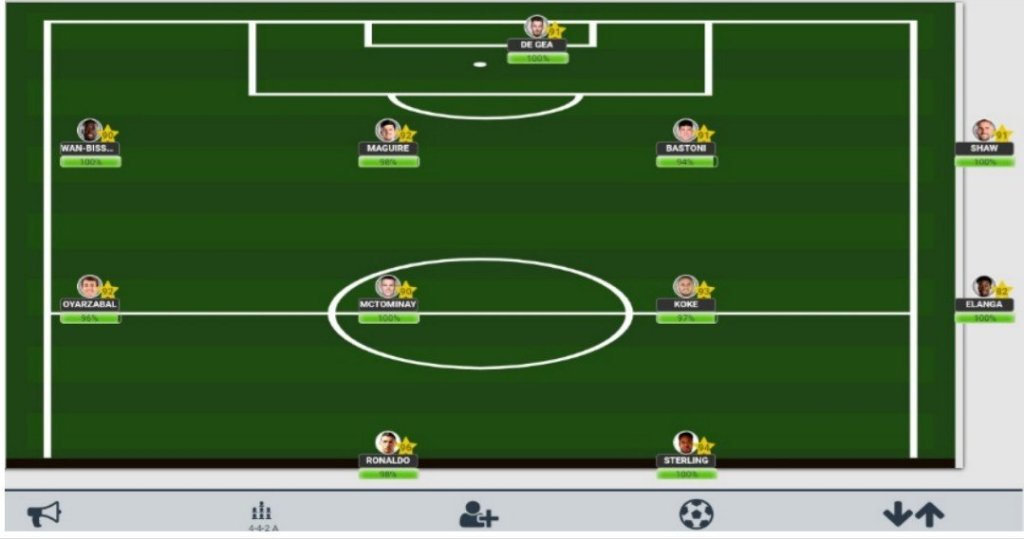
What I’ve realized over the years is that whenever you manage a team for the first time they are always set up in a 4-4-2A system. Maybe it’s down to the popularity of that formation or because it’s one of the more simpler formations to understand, especially for newbies.
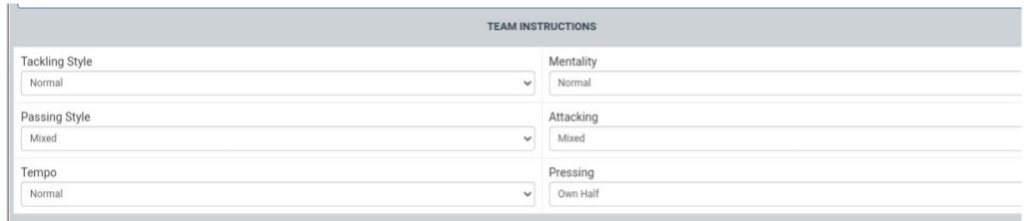
Below the starting X1 there are 6 different icons, each representing different sub components which are necessary for you to complete the tactical set up. The first icon is a horn symbol where you will find the team instructions, playing style and player instructions.
Team instructions consist of the passing style you will implement, the part of the field you prefer to attack, the area of the field you will apply pressure on the opposition, the tempo of your posession, your style of tackling, and, most importantly, how your players will approach the game mentally:
Play style consists of six different approaches that are compatable to your team instructions. These six are: Men behind ball, Counter attack, Tight marking, Use playmaker, Offside trap, and Use target man. Some work well with others while some just don’t work together at all. It’s up to you to gain the knowledge of understanding how they work. But, not to worry my companion, these blog posts have got you covered!

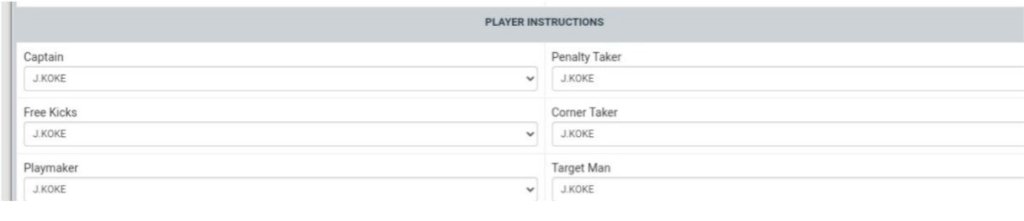
Lastly,we have player instructions where you get to choose which players take set pieces, who your captain is and who your playmaker and target man are. By default, the number ‘8’ is set to do everyone of these instructions:
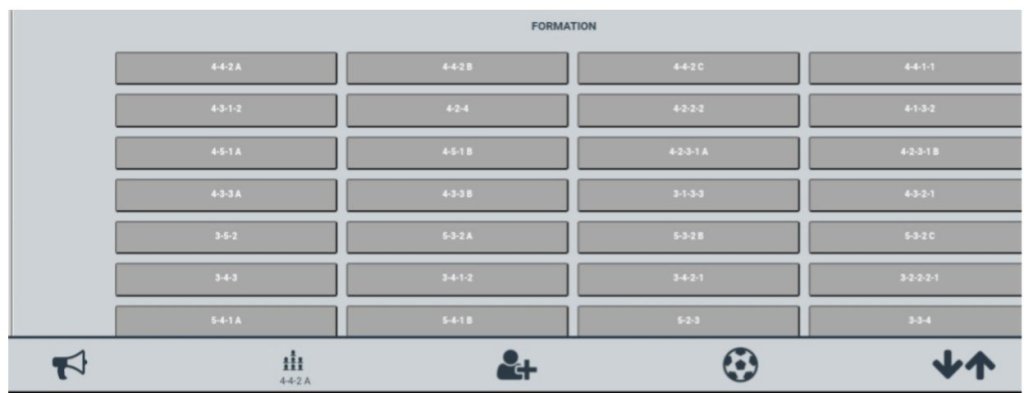
The next icon on the list is the formations and it’s actually a 442 looking icon which goes to show how much the creators love that formation. They are 28 formations in total to choose from ranging from 4-5-1 to 3-3-4. Most of these formations have an ‘A’ type and ‘B’ and even a ‘C’ type which indicates that they are subtle differences between each even though it is stated as the same formation. I will be doing an entire series on every formation which I will call the ‘Formation matters’ series. The name of this series is from the pouplar 90’s show Family matters which has nothing to do with soccer but I used to love watching it back when I was a lad:
The third icon is the substitues icon which is simply a player emoji with a plus sign next to it. As I mentioned in the navigation series on blog post episode 3: Soccermanager worlds navigation: club page, you are given the option of having 7 players on the bench during each match. I’ve come across a lot of human mangers who do not take how their subs bench looks seriously. Maybe it’s just me (yeah It probably is….) but how I approcah the subs is by putting them in order starting from GK,CB,FB,CM,WING,ATTK,ATTK. Its just seems more professional looking in my opinion:

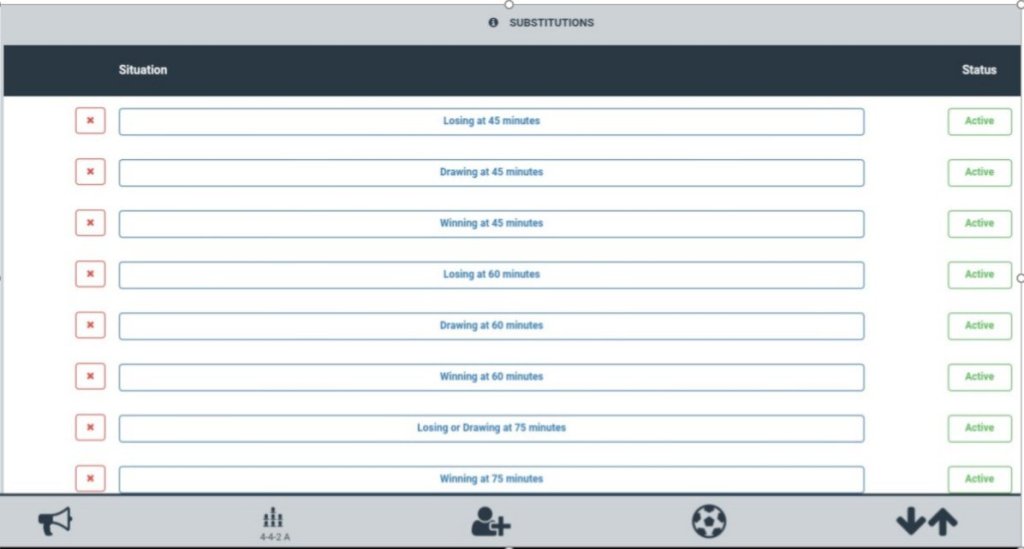
Next up we have the in game instructions icon which is a soccer ball emoji. In soccermanager, you can make up 8 different changes during the course of a match at three different time intervals. These intervals are at half time, around the 60 minute mark and the 75 minute mark. You can make these changes whether you are winning, drawing or losing. The in game instructions can be anything ranging from making a formational change, a positional change, changing your passing style or changing your set piece taker. This is by far the most flawed aspect of this game. I will dive into this topic in a future blog post but this is all you need to know at this point:
Lastly, the sixth icon is the arrows icom which is symbolized with an up and down arrow emoji. This is one of those attention to detail type of items as it gives individual players a specific responsibility depending on what you want said player to do. On the surface, the option with these arrows is either to give a player a defensive role or an attacking role but it is WAY more nuanced than that. To illustrate my point, let me show you an eample:
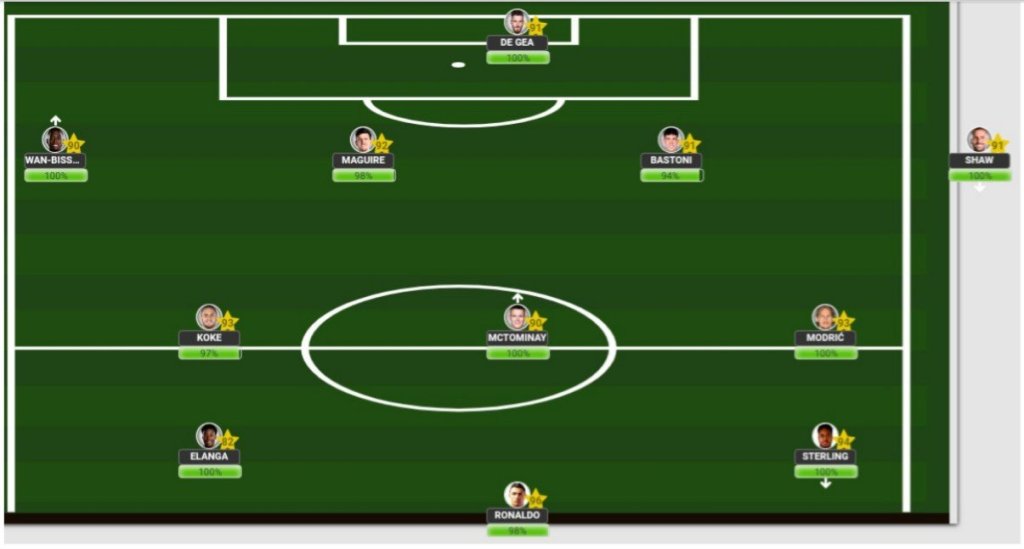
In this example, I have set up the team in a 4-3-3 A formation and have given instructions to Wan Bissaka, Shaw, Mctominay and Sterling via the use of the arrows. When my team have posession of the ball we will effectively turn the 4-3-3 into a 3-5-2. How does this happen? Glad you aksed…. Wan Bissaka’s arrow tucks him in so that he is now a 3rd Centre back alongise Maguire and Bastoni thus allowing him to become the right centreback while Maguire plays as the central of the 3 and Bastoni as the left centre back. Shaw’s arrow means that he will now play more like a left wingback in posession with Elanga playing as a right wingback on the opposite side. Mctominay’s arrow puts him in the position of being the sole pivot but more as a ball winner rather than a deep lying playmaker, and Sterling’s arrow puts him up top alongside The goat…. When we are out of posession we defer back to the 4-3-3 formation. All of this occurred by simply giving a few players some in game responsibilities. One important thing to note is that unless you have the correct team instructions and play style it won’t work. If I decided to use Ronaldo as a target man then he will effectively negate Sterling’s ability to impact the game as a striker due to the type of player Sterling is. If I don’t press high up the field then the formational switch will be less effective because the transition from the 4-3-3 to 3-5-2 will occur more often if the ball is won closer to the opposition’s goal. Small actions but big impact.
There you have it. The first blog post within this series done and dusted. Make sure you stick around as I’m about to go full Pep Guardiola mode and you do not want to miss it!
